
How To Install A Smoke Detector Unit At Home?
To detect rising smoke from a fire, a smoke detector installation should be done on each floor of your home. According to one report, 41 percent of fires are caused by a lack of a smoke detector. They should be installed inside or outside each bedroom and common space and in laundry facilities and kitchens where fires might start. Consider placing smoke alarms at least 10 feet away from any kitchen equipment to prevent false alerts. If you have a bigger house, you might consider installing extra alarms in hallways and stairwells. By installing an interconnected smoke detector, the alarm sound will be heard all around your home.
Where Should Smoke Detectors Be Installed?
Installing smoke detectors does not have to be as complex as the fire code manuals. Unless you enjoy reading fire-related material, the installation recommendations listed below should be enough for smoke detector placement.
As many as possible should be installed in all sleeping spaces like bedrooms, guest rooms, living rooms with pull-out sofas, etc. Also, you should install it in common passageways between sleeping areas, basement, attic, and garage, near the kitchen but at least 20 feet away from the stove and oven, and anywhere else you wish for. The ones that are highlighted are a bit better.
Smoke detectors operate best on the ceiling since that is where smoke settles initially. Make every effort to ensure that your smoke detector is installed in that location. If installing it in the ceiling is not an option for your property, mount it as close to the ceiling as feasible but no more than 12 inches down the wall.
Checklist Or To-do List For Smoke Detector
It is critical to understand how and where to put smoke detectors for your protection. Here are a few things to keep in mind while purchasing and installing smoke detectors in your house.
Before installation, ensure that the detector has been authorized by Underwriters Laboratories (UL) to fulfill stringent testing and safety standards.
Before a smoke detector installation, read the handbook to ensure correct installation.
Check to see if your smoke detector detects ionization or photoelectric fires, or both.
Install smoke alarms on the ceiling. If the smoke detector is mounted on the wall, it should be no more than 12 inches from the ceiling.
When feasible, connect several detectors so that all alerts sound.
Not To-Do-List For Smoke detector
- On windows or sliding doors, the heat of smoke or fire may not be picked up by the winds and air.
- In humid or wet environments, such as the bathroom
- In locations prone to dust and grime accumulation, such as unfinished attics
- In colder areas like sunrooms or porches
- Close to ceiling fans or air vents
- In garages, because they are frequently unheated and the colder temperatures may not detect smoke or fire.
Also, you can contact any smoke detector installation service provider in San Diego to know more details.
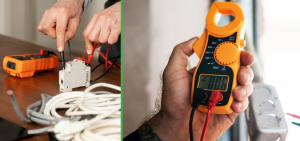
Material And Tools For Smoke Detector
The smoke detector needs a couple of things to install in your homes, such as Plastic wall anchors, wall screws, wire stripper, wire cutter, battery, wire nuts, Phillips’s screwdriver, sharp pencil, drill, sharp pencil, wire nuts, and more.
Installation Tips For Smoke Detector
Smoke detector got some suitable place to fit in for complete functions, as well as it has specific another component to take care with step by step, this is kind of instructions of smoke detector installation services you can consider

STEP 1: Choose A Spot For Mounting.
Your house may already have an existing fire alarm system, but if not, follow these tips to make sure your intended sites are up-to-snuff. Pre-Wired systems should not be taken at face value. Here are a few suggestions about a smoke detector.
Choosing the right room:
Smoke alarms may be purchased tailored for specific parts of your house, such as bedrooms and living rooms. The majority of smoke detectors are battery-powered.
They have lithium-ion batteries that last for 10 years, so you won’t have to worry about being awakened at 3 am by chirping sounds. To assist you in waking up, some devices have a voice alarm to wake you up.
To avoid fake alarms from smoke and carbon monoxide, etc., from the kitchen, you can use kitchen specific alarms.
Choosing the proper placement:
For this reason, like smoke rises, smoke detectors should be installed in high places, such as the ceiling. It’s preferable to mount it in the middle of the ceiling. There should be a 4-inch minimum distance between a wall and the ceiling if it is to be installed elsewhere on the ceiling.
In the places where walls meet ceilings as well as dead air pockets can occur, smoke detectors should not be placed in corners where smoke is likely to rise and be detected.
Installing wall-mounted detectors at least four inches from the ceiling will help to eliminate this dead air zone.
Also, a vaulted ceiling might have dead air at the apex if it’s high enough. Install your alarm system at least 4 inches away from the top of the roof structure.
STEP 2: Turn Off The Power Availability Only For Hard-wired Units
Your fire alarm system must be switched off. In your electrical panel, turn off the “fire alarm” or equivalent breakers. You may connect it to a circuit for illumination. Connect a pen tester to the wires of the smoke detector and remove it from its mounting bracket to check that you have switched off the circuit.
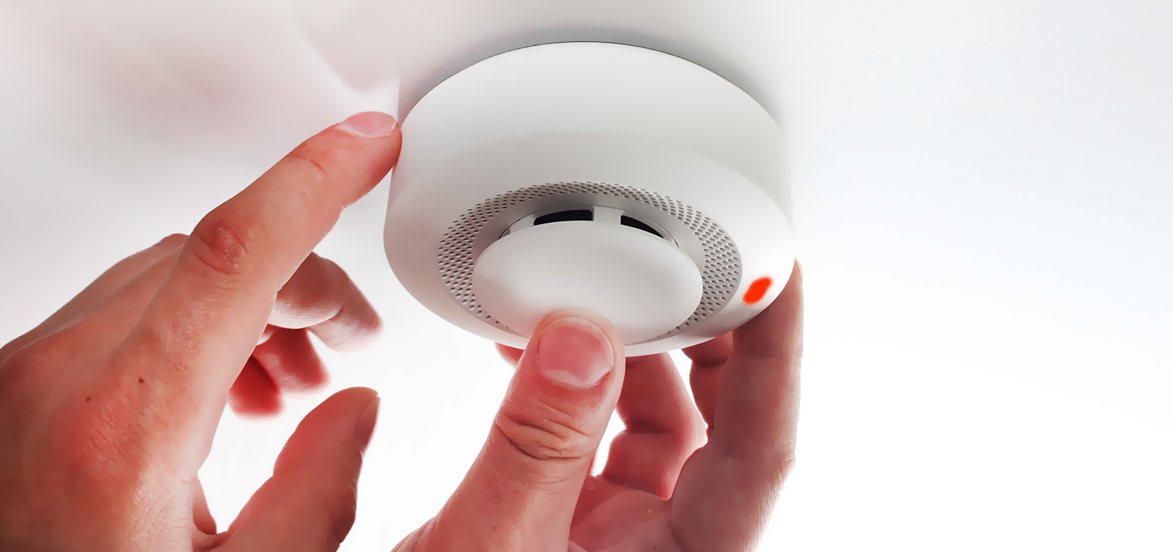
STEP 3: Attach The Smoke Detector’s Mounting Bracket.
A mounting bracket is included with each smoke detector to make installation and battery replacements easier. Twist the detector and bracket apart to remove it. A loud click will be felt and heard.
Hold the bracket in place on the ceiling or wall for battery-powered smoke detectors. Mark the two mounting screws with a pencil on the ceiling or wall. Carefully drill the two holes using an anchor kit-compatible drill bit. Screw the mounting bracket into the two plastic anchors after tapping them into place. To avoid over-tightening the screws and cracking the bracket, use a screwdriver rather than a drill.
Fire detectors should be hard-wired and connected to a pre-existing electrical box. Disengage the two mounting screws in the electrical box’s corners and slide the replacement bracket into position. Then tighten the two mounting screws. The wires need to be pulled in tandem through the bracket. Tighten the screws one more time using a screwdriver to avoid damaging the bracket.
STEP 4: Recharge The Smoke Detector’s Battery.
For battery-operated smoke alarms, open the battery door by trapping your fingernail or a penny behind the tab. However, this will disclose the battery compartment. Your specific device may require AA, CR123, or 9V batteries. Experts recommended that you should install your battery’s positive (+) and negative (-) ends following their respective indications.
Your item may include a pull tab that you need to remove in order to activate the provided battery. Even if this is the case, it is still advisable to open the battery door to check that your battery is not damaged or leaking. You may also write down the sort of battery that your gadget requires so that you can always keep it on hand.
For hard-wired smoke detectors, assemble the supplied wiring harness for hard-wired smoke detectors with the circuit breaker turned off. When you’re finished, you’ll want to connect it back to those wires that you pulled through during the last step. Wire strippers can be used to expose the harness wires. Connect the harness wires with the system wires by twisting them together with matching wire nuts. Check to see if the wires are secure by giving them a gentle twist. Connect the smoke detector to the harness.
When the harness wires are black and white, but the system wires are yellow, white, and red, wire nuts are utilized to connect the yellow and red wires.
However, this is simple, but one thing to keep in mind is that the system wiring powers hard-wired machines containing battery backups. Before you attach your smoke detector to the base, you may need to remove a pull tab to activate the battery. Examine the instructions that came with your specific device.
STEP 5: Screw The Smoke Detector Into The Base.
This is a straightforward twist-lock technique. Place your smoke detector on top of the bracket and twist clockwise until it snaps into place. Don’t be alarmed if specific battery-powered devices beep or light up at this stage.
STEP 6: Turn On And Test The Smoke Detector.
Battery-powered units are now available. If you have to turn off the power for a hard-wired system, now is the time to turn it back on. Then, return to the electrical panel and switch on the breaker once more. Your new detector will almost certainly emit a beep to indicate that it is operational. Additionally, an LED light may be included to show that the smoke detector is working.
A test button will appear on your device. To activate the alarm, press and hold the button. What if your fire alarm still did not work? Consider these options for troubleshooting the gadget if it doesn’t work properly.
- Check that the breaker is turned on for hard-wired units, or turn it off and inspect your wiring.
- Check that the battery was adequately fitted, or try a different battery entirely.
- Check that the smoke detector is securely attached to the base. Some devices will not turn on if they are not properly seated.
- Problems that do not resolve themselves may be the equipment’s fault rather than your work performance. Contact the manufacturer or return to the retailer to obtain a replacement.
Smoke Detectors Testing Is Required.
- Servicing of smoke alarms should follow the manufacturer’s instructions.
- Test smoke alarms at least once a month by pressing the test button.
- Every member of the household is aware of how to respond when the smoke alarm sounds.
- To maintain smoke alarms operating correctly, follow the manufacturer’s cleaning recommendations. The instructions are either included in the packaging or may be accessed online.
- Ten years is the anticipated lifespan of smoke alarms equipped with non-replaceable 10-year batteries. As soon as you hear the smoke alarm beeping, it’s time to change the smoke alarm’s battery.
- Battery-operated smoke alarms must be updated every year. A low-battery warning will sound on the alarm. Replace the battery immediately.
- Whenever you need to replace a battery, see the alarm’s battery list or manufacturer’s instructions. Battery (brand and model)-specific instructions are given by the manufacturer. Other types of batteries might cause the smoke alarm to malfunction.
Conclusion
Smoke detectors are one of the most essential and crucial equipment that every property should be equipped with. It’s better to equip your home properly with smoke detectors to prevent any form of unlikely fire situation that might cause loss of life and property. It is also essential that you run an inspection on a regular basis to ensure that all the smoke detectors in your home are working and properly functioning. They are safety reminders that would help you remain alarmed in case there’s a fire.